Get Started
This guide will get you up and running with Apideck. To get started on our platform, you need to:
- Create an account
- Enable Unified APIs and connectors
- Get your API key
- Create a consumer
- Connect integrations in Vault
After completing these steps, you can make API calls to our Unified APIs 🎉
Step 1: Create an account
If you haven't already, head over to our Signup page and create an account. Choose an application name and a subdomain. Afterward, you will be redirected to the Apideck dashboard.
Step 2: Enable Unified APIs and connectors
Go to the Configuration page in the Apideck dashboard. Choose one or more Unified APIs to enable. You'll see a list of the available connectors for each Unified API. Choose a couple of connectors to enable. The Unified APIs and connectors you select become available to your users in Vault.
OAuth Apps
By default, all connectors use sandbox OAuth apps from Apideck. This makes it easy for you to get started and connect integrations right away.
Custom OAuth apps
Once you're ready to ship your integrations with Apideck, you should use your own OAuth apps. Apideck supports bringing your own OAuth clients for supported services by configuring them in our dashboard. This will make sure users see your brand instead of Apideck when they connect integrations.
Note
Creating an OAuth app can differ per connector and sometimes requires a review. Luckily we've got you covered; check out our handy overview of OAuth app store requirements.
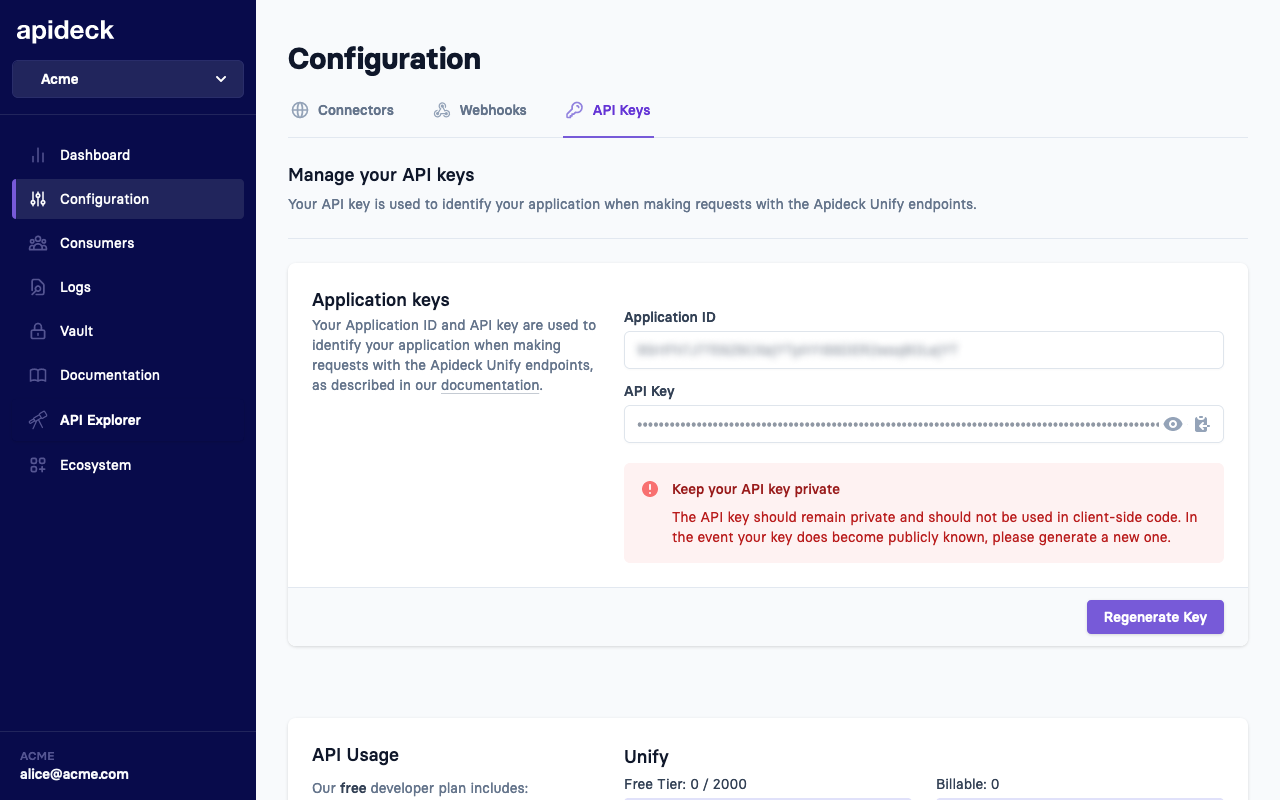
Step 3: Get your API key
Go to the API Keys page in the Apideck dashboard. Copy your App ID and API key. If your API key ever gets compromised, you can regenerate it on this page.
Step 4: Create a consumer
Apideck supports creating multiple consumers per application. Vault lets your users (consumers in Apideck) easily connect and configure integrations. You can create a consumer through a Vault session.
Consumers need to have a unique ID. You can freely choose a consumer ID yourself. Most of the time, this is an ID of your internal data model that represents a user or account in your system (for example
account:12345). If the consumer doesn't exist yet, Vault will upsert a consumer based on your ID.
Note 🚨
Session creation should always happen server-side to prevent token leakage.
Use the API call below to create a session for a consumer. This will return a Vault URL that you forward to a consumer to connect integrations.
Step 5: Connect integrations in Vault
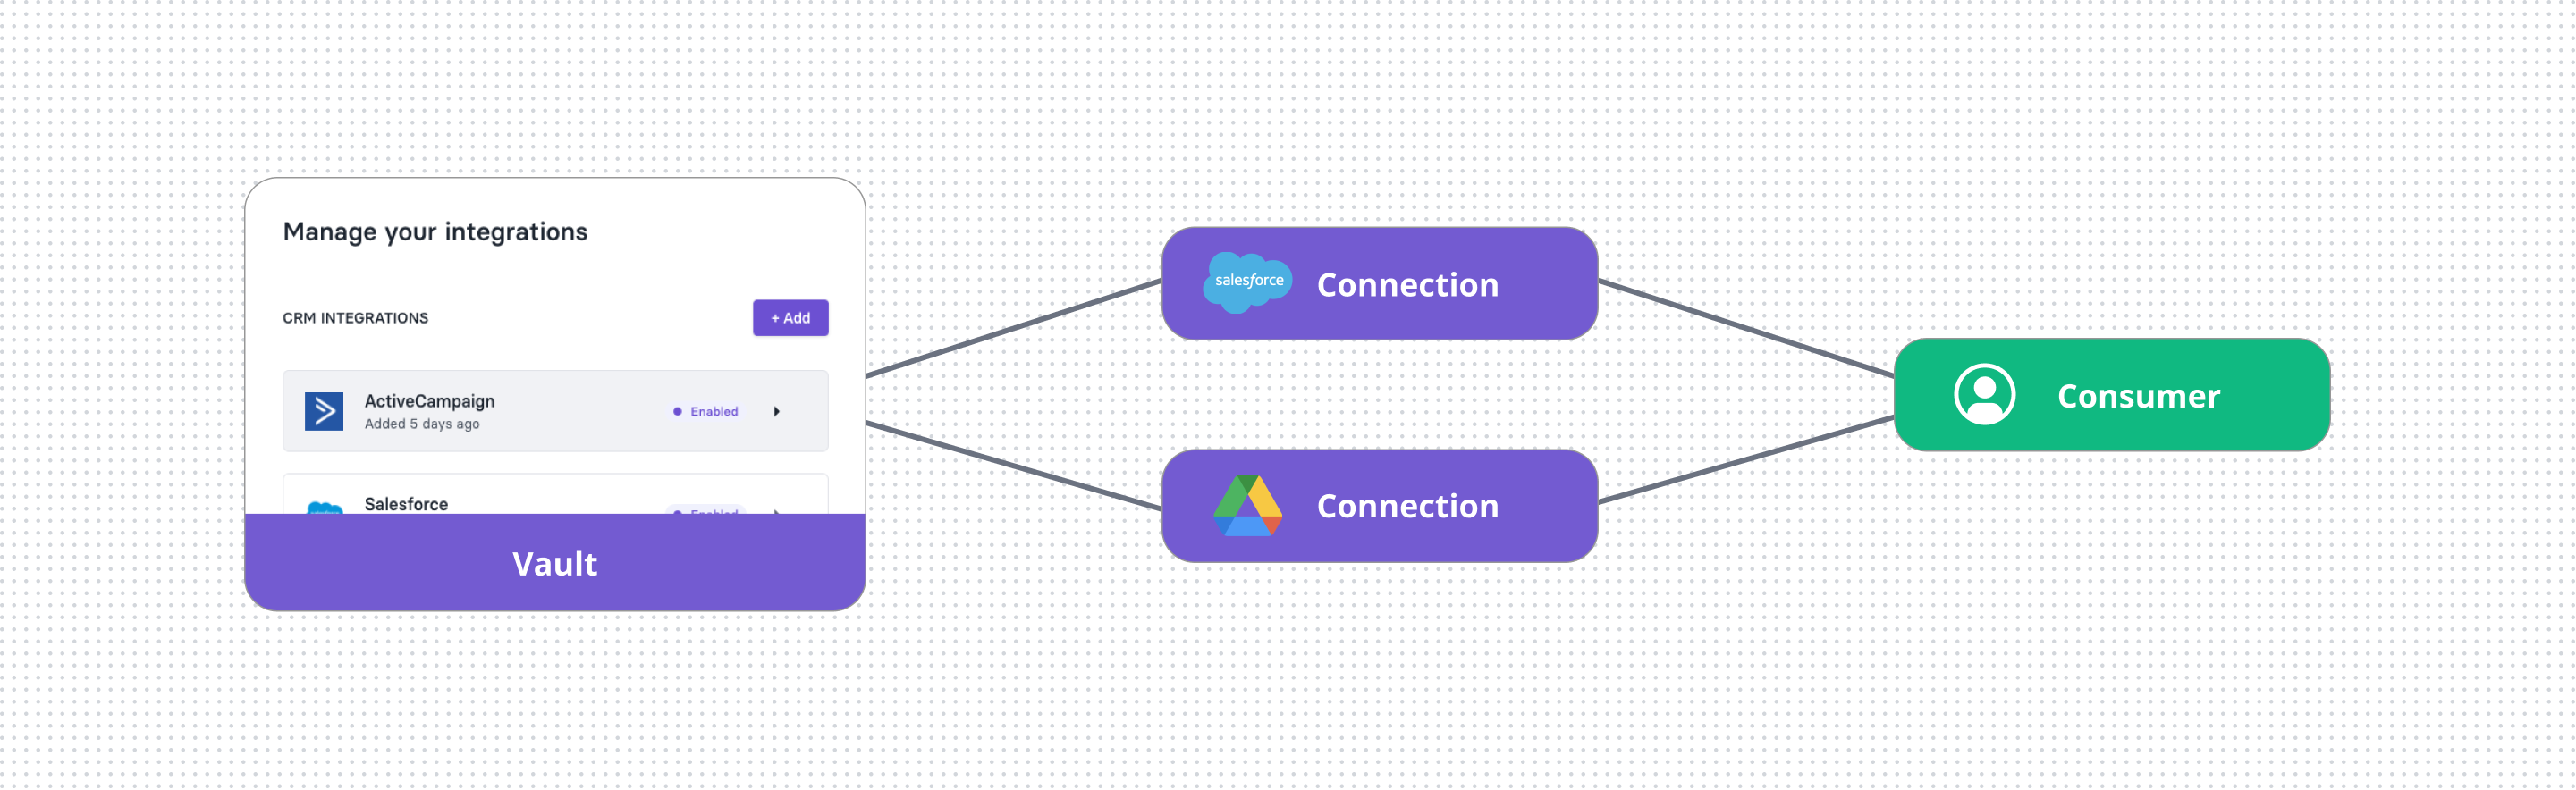
Apideck Vault lets your users connect their integration accounts. It stores the credentials securely and lets you make authorized API calls on your users' behalf (consumers in Apideck).
Vault connections hold the credentials for a given connector (for example Google Drive). A connection is always scoped to a consumer.
There are 3 ways to integrate Vault
- Vault JS: Embed integrations inside your app in minutes.
You can install Vault JS to quickly provide an embedded experience for your customers. We also provide specific React and Vue packages to make this even easier. - Hosted Vault: A ready-to-use, themable integrations page, hosted by Apideck.
If your application uses React you can follow this guide to get started. - Custom: Use the Vault API directly to create your own integrations page inside your app.
When using this approach, you can follow this guide to learn about authorizing connections.
To get started, we'll use Hosted Vault. Head over to the Vault page in the Apideck dashboard and under Hosted Vault, click Launch Demo. This opens Hosted Vault for a test consumer.
Alternatively use the Vault URL generated in step 4.
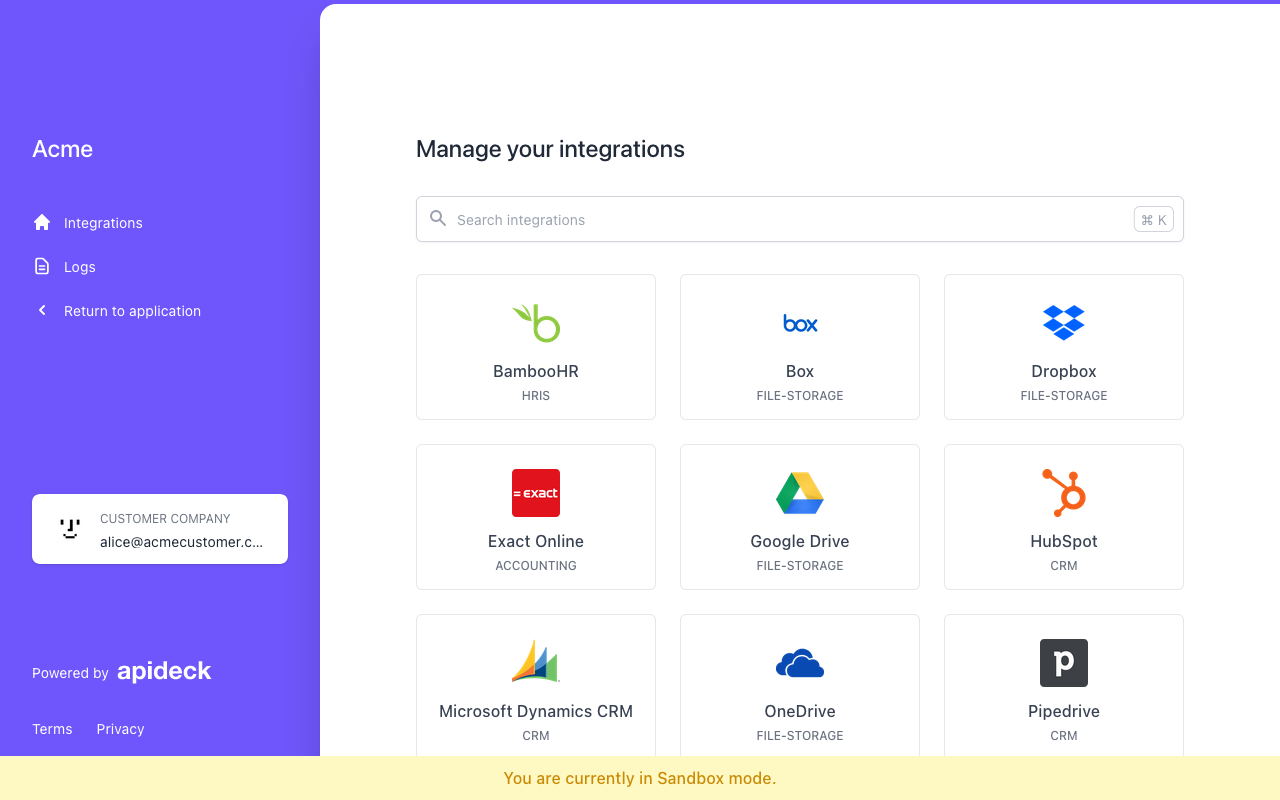
Go to the Integrations page in Hosted Vault. Search for a connector that you enabled in step 3 and click Add.
On the integration's page click Authorize, you will be redirected to the connector and asked to authorize Apideck. After you complete this flow, you will be redirected back to Hosted Vault.
The connector is now ready for use. All that's left now is to make your first API call 🎉
Note
Depending on the connector, you might need to complete some settings for a connection to be callable. This will be indicated in Hosted Vault with a "Needs configuration" badge. Fill in the settings and hit save.
First API call
You now have all the building blocks to make your first call to the Apideck API. Here's an example
curlto the CRM API to get you started.
{APP_ID}and{API_KEY}are the values you copied in step 3.{SERVICE_ID}is the Connector ID you want to make a request to. This ID is the name of the connector in kebab-case (for examplegoogle-drive
). Find the full list of connector IDs here.test-consumer
is the consumer ID that Hosted Vault uses for test sessions. The connector we authorized earlier is linked to this consumer. When you're using Apideck with real users, you should use a unique user identifier as consumer ID.
Note 🚨
API calls to Apideck APIs should always happen server-side to prevent token leakage.
Extras
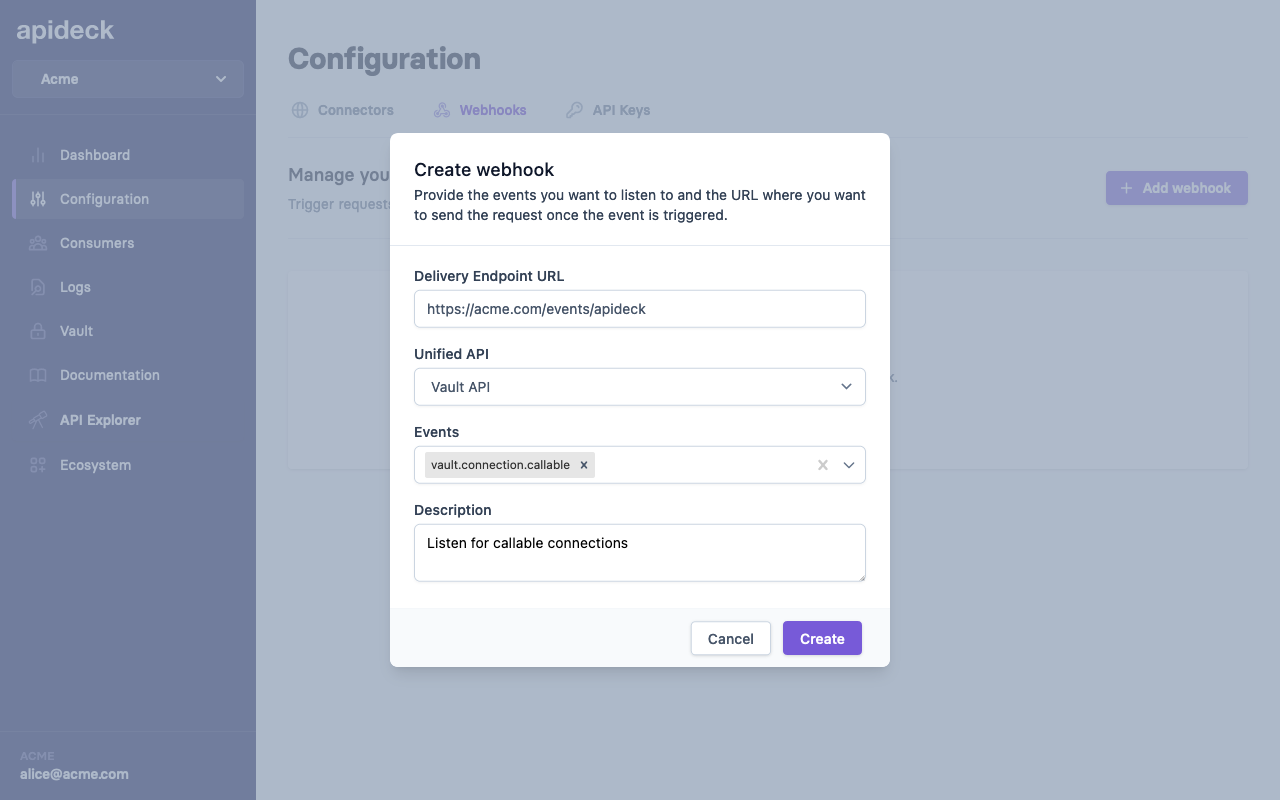
Get notified when your users connect integrations
We offer Webhook support so you can get notified as soon as a consumer configures a connection. You can find more information about Webhooks in the Webhook API docs or configure webhooks in Apideck.
SDKs
Our SDKs are the easiest way to integrate our API into your codebase. Find out how to get started with it here.
At the moment we have SDKs for Javascript and PHP. SDKs for other popular languages such as Python, C#, Java and Rust are coming soon.
API Tools
The Apideck API Explorer is a great way to explore our APIs through a UI.
Tip 💡
From the Apideck dashboard, you can open the API Explorer with temporary credentials prefilled. Use the links in the sidebar.
We also offer integrations with Postman and Insomnia. Head over to one of our API references and use the Actions dropdown to use these tools.
The OpenAPI specifications for all of our APIs are open source.
Samples
Looking for inspiration? Take a look at our sample projects. All of our samples are completely open source.